
Basics of REST Services #
Representational State Transfer(REST) is a software architectural style that is used for creating web services and was described by Roy Fielding in 2000. A web service in simpler terms provides an interface for an application to connect to a back-end service for exchange of information. The design rationale behind the web architecture can be described by an architectural style consisting of the set of constraints that must be satisfied. The following are the guiding principles:
-
Client-Server The first constraint is that of the client-server architectural style.The principal behind this constraint is that there has to be a separation of concern in the client-server architecture. The user interface concerns have to be separate from the data storage concerns. With this separation we improve portability of the user interface across multiple platforms and both the components can evolve separately.
-
Stateless The next constraint is that the communication between the user interface and the backend has to be stateless in nature such that each request from the client must contain all the information required to understand the request.
-
Cacheable In order to improve the network efficiency the client can cache the resources sent by the server with a constraint that the data within a response to a particular request be implicitly or explicitly labelled as cacheable. The advantage of this constraint is that they have the potential to partially or completely eliminate some interactions, improving efficiency,scalability and user perceived performance. The trade-off is that a cache can decrease reliability of the stale data within the cache than from the data that could have been obtained had the request been sent directly.
-
Uniform Interface The central feature for the REST architectural style is its emphasis on uniform interface between components. Implementations are decoupled from the services they provide,which encourages independent evolvability.
-
Layered System This constraint is added to improve scalability in that it allows the architecture to be composed of hierarchical layers and the client cannot ordinarily tell whether it’s connected directly to the end server or an intermediary one.
Choosing a Format #
The communication between the client and server via REST API requires that a specific format be agreed upon. The most common format is the JSON and XML format.
Hypertext Transfer Protocol #
The Hypertext Transfer Protocol(HTTP) is a protocol for distributing contents via a predefined set of methods. By convention, REST APIs rely on these methods. The following table describes the commonly used HTTP methods:
| HTTP Method | Purpose |
|---|---|
| POST | Create a new resource |
| GET | Read an existing resource |
| PUT | Update an existing resource |
| DELETE | Delete an existing resource |
Whenever a client consumes a REST API with either of the methods, there is HTTP status code associated with a response which gives an indication of the success or failure of the request. The following are the commonly used HTTP status code:
| HTTP Status Code | Success/Failure | Meaning |
|---|---|---|
| 200 OK | Success | GET - Resource returned PUT - Provide a status message or return resource |
| 201 Created | Success | POST - the resource is created successfully |
| 204 No Content | Success | PUT or DELETE - Response to successful update or delete |
| 400 Bad Request | Failure | ALL HTTP Methods - Returns Error messages |
| 401 Unauthorized | Failure | ALL HTTP Methods - Authentication is required for the request |
| 403 Forbidden | Failure | Failure |
| 404 Not Found | Failure | ALL HTTP Methods - Resource not found |
For a complete listing,you can visit this page HTTP Status Codes
REST API Best Practices #
Having a strong and consistent naming convention for your REST APIs will make them self explanatory. The following guidelines will help you naming your APIs:
-
A resource can be a singleton or a collection for example /user is a singleton while /users is a collection. It’s always best to use pluralized resource names for example
/users - returns all the users /users/{id}/address - returns the details of a particular user
-
The URI resources should be used in the form of nouns and should not indicate any kind of CRUD(Create,Read,Update and Delete functionality) for example:
Use /users/{id} instead of /getusers -
Use forward slashes to indicate hierarchy between a individual resource and a collection, the following examples will indicate the same:
/users/{id}/address falls under the /users/{id} which will fall under /users collections /routers{ip}/utilisation falls under the /routers/{ip} which in turn will fall under the /routers collections -
In order to filter or sort a collection, the REST API should allow query parameters to be passed in the URI. For example:
/users?country=INDIA will filter all the users in the India region. /users?country=INDIA&city=Bangalore will filter all the users in India located in Bangalore. -
By convention resources should be named in lower cases and underscore should be replaced with hyphen /users/{id}/account-settings instead of /users/{id}/account_settings
-
No file extensions like .xml or .csv should be used in naming URI
-
The URIs should not have any trailing forward slashes /users/{id}/account_settings instead of users/{id}/account_settings/
What is Django Rest Framework #
The Django Rest Framework(DRF) is the defacto package for building REST APIs with Django. DRF is an open source project with a very strong community. The DRF contains a wide set of out of the box features that has a clear segregation of functionalities when trying to design APIs to represent a model.
Why Use the Django Rest Framework #
The main advantages of this framework are:
- DRF is based on object oriented design and is extensible
- The serializer system is very powerful
- It’s built directly off of Django’s CBV (Class Based Views)
- It comes with a host of different views for API generation
- It supports ModelResources with out-of-the box default implementations
- HTTP response handling and content type negotiations
- Permission classes for defining authentications and authorizations for APIs.
Requirements #
The DRF package requires the following Python(3.5 and greater) Django(2.2,3.0)
Installation #
Installation can be done using pip:
pip install djangorestframeworkAdditionally you will have to add the package in your Django project settings file:
INSTALLED_APS ={
         ………..
         ………..
         rest_framework
}
Now we are ready to use the framework for creating REST APIs.
The Django Rest Framework has some very interesting concepts that need to be discussed so as to create some production grade REST APIs but before we delve into the theory, it will be useful to see something in action which will help you in understanding the concepts we will discuss later.
Creating an API #
We will be creating an API endpoint to store contact details and later on retrieve those values.
Setting up the Environment #
First you have to create a virtual environment to hold your project code and the libraries. Create a directory and move into it:
mkdir drf_tutorial && cd $_Once that is done you can create a virtual environment using virtualenv and activate it as follows:
virtualenv dev
source dev/bin/activate
Now we can install the dependencies:
pip install django
pip install djangorestframework
When the installation is done we can create a new django project:
django-admin startproject address_bookNow we can start adding applications to our project.
Adding An Application to the project #
A Django project can have many applications and each application should do one thing, in this way we can achieve modularity in our project. Change into the address_book directory and create a new application:
cd address_book
django-admin startapp contacts
This will create a new contacts app in the address_book folder. Now inorder for Django to understand that we have a new contacts app, we need to register it in the address_book/settings.py file as follows:
INSTALLED_APPS = [
   'django.contrib.admin',
   'django.contrib.auth',
   'django.contrib.contenttypes',
   'django.contrib.sessions',
   'django.contrib.messages',
   'django.contrib.staticfiles',
   'contacts'
]
Creating a Model #
A model is a representation of a table in the database. Models in Django have field/column names along with their data types. So now in our contacts app we will be needing the following columns:
- Name
- Email address
- Contact Number
- Created at timestamp field Now let’s go ahead and edit the contacts/models.py file and the following model definition:
from django.db import models

class Contacts(models.Model):
   name = models.CharField(max_length=150)
   email = models.EmailField()
   contact_number = models.CharField(max_length=100)
   created_at = models.DateTimeField(auto_now_add=True)
Now with the model in place, let’s perform a makemigrations by running the following command from the address_book directory:
python manage.py makemigrations contactsAnd finally migrate to the database with:
python manage.py migrate contactsCreating Django REST Serializers #
Serialization is the process of transforming one object into another data format. Here we are basically converting a Python Model class to JSON so that it can be transferred via API. A serializer can work the other i.e JSON to objects. Therefore it’s very much necessary to serialize models so that it can operate via an API. Create a new file named contacts/serializers.py, this will take our Contact models and the fields that we require to serialize:
from rest_framework import serializers
from .models import Contacts

class ContactsSerializers(serializers.ModelSerializer):
   class Meta:
       model = Contacts
       fields = ('id','name','email','contact_number','created_at')
As can be seen, we have used a ModelSerializer which in simple terms let’s us serialize a model easily along with fields we need to serialize.
Creating API Views and URLs #
The Django Rest Framework provides quite a number of Views for designing APIs. For the purpose of the tutorial we will be using the Generic API Views and more specifically we will use the ListCreateAPIView which will handle both the GET and POST request.
In the contacts/views.py, add the following lines:
from .models import Contacts
from .serializers import ContactsSerializers
from rest_framework import generics

class ContactsListCreate(generics.ListCreateAPIView):
   queryset = Contacts.objects.all()
   serializer_class = ContactsSerializers
Next we have to wire up the ContactsListCreate View to the API /api/contacts so as to make both GET and POST requests.
For that we have to configure URL mapping to the contacts app. That can be done in the following file address_book/urls.py by adding the following lines:
from django.urls import path,include

urlpatterns = [
   path('', include('contacts.urls')),
]
Next is to link up the ContactListCreate View to an API we have to create a urls.py file in the contacts app and add the following lines:
from django.urls import path
from . import views

urlpatterns = [
   path('api/contacts',views.ContactsListCreate.as_view()),
]
Make sure the Django Rest Framework is enabled in the settings.py file:
INSTALLED_APPS = [
   'django.contrib.admin',
   'django.contrib.auth',
   'django.contrib.contenttypes',
   'django.contrib.sessions',
   'django.contrib.messages',
   'django.contrib.staticfiles',
   'contacts',
   'rest_framework'
]
Now let’s run the server to check if everything is working as expected:
python manage.py runserverIf no error is displayed in the terminal, we should be able to invoke the API from the browser as http://localhost:8000/api/contacts and you shall be able to see the following screen:
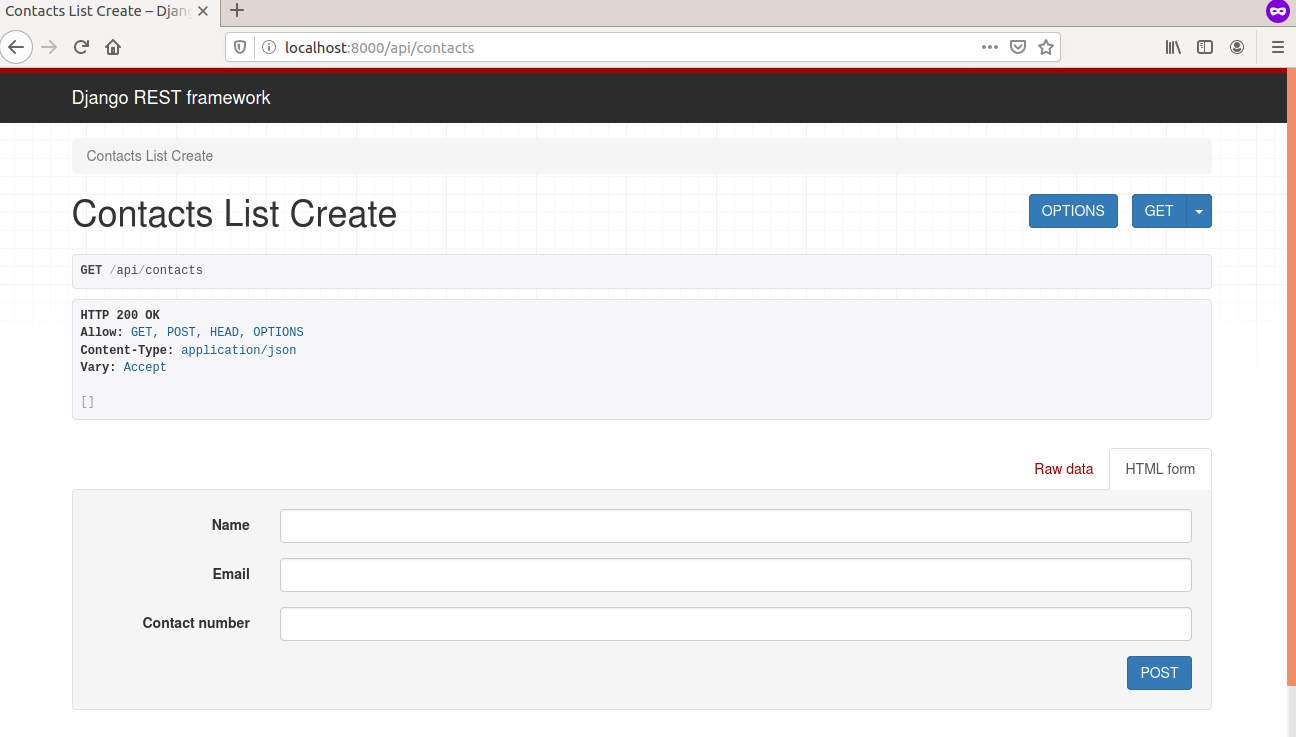
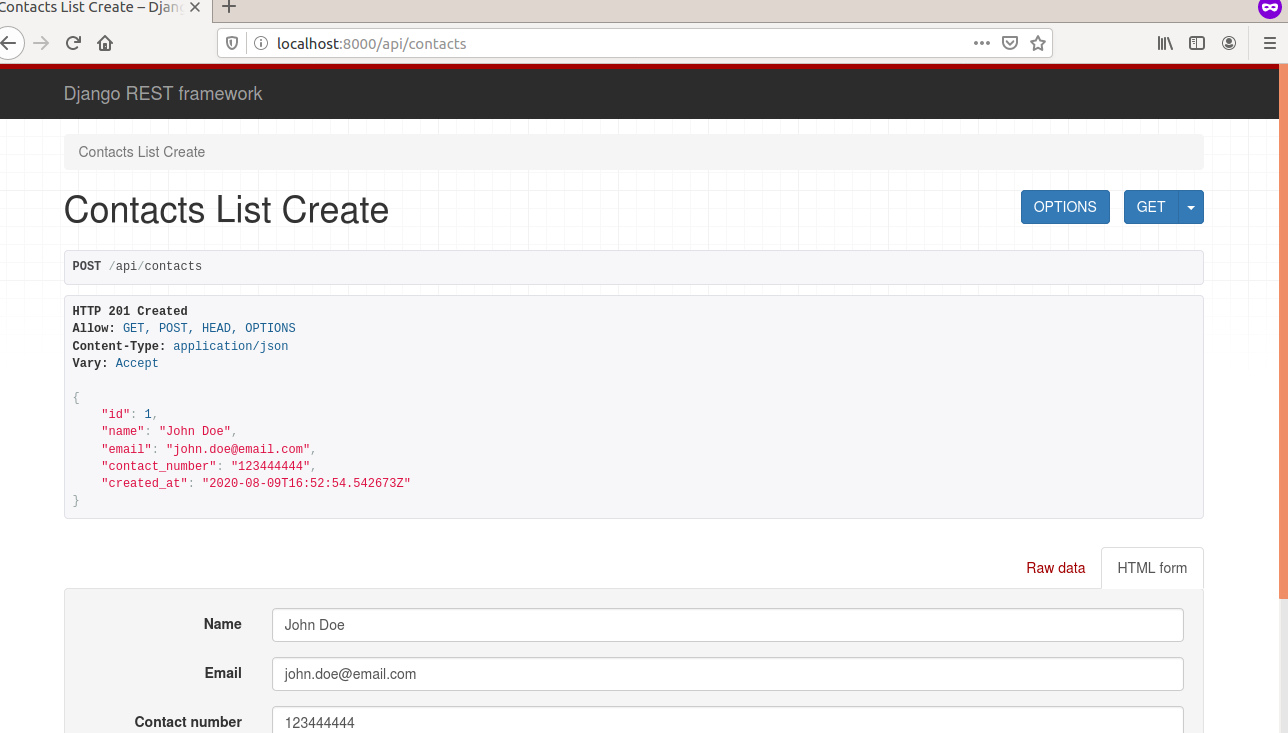
While on this screen you can create some contacts in the form available and on submitting the form which will be a POST request, the page will refresh and show the details you had just entered( a GET request) along with the form. This can be seen below:
This was just a basic introduction to DRF. For more information see wth following references: